Overview
Iptables, which is also often referred to as the Netfilter project (http://www.netfilter.org) for Linux, enables an administrator or developer to filter and log traffic entering, exiting, or being forwarded across a Linux computer and network. Iptables is both powerful and complex. This article discusses the basics of constructing an iptables script for protecting cameras behind a Yocto Linux router (actually an LS1046A Freeway Board). We're writing this article because embedded Linux, Yocto, and the Netfilter project are all very important technologies for the Private Island ® platform.
As you probably know, using surveillance cameras with Linux is an exercise in a lack of trust. We shouldn't trust our cameras, and we shouldn't trust off-the-shelf routers and firewalls to keep intruders from accessing our cameras. We have witnessed networked cameras power up and start trying to access servers in China, and the Internet is littered with stories of malicious activity by hackers watching over unsuspecting users. To make matters worse, the norm is becoming to let big brother manage our cameras and watch us as we go about our daily lives.
However, when used properly and securely, surveillance cameras are a great tool for staying both secure and private. In this article, we discuss some basics in configuring an untrusted camera within a Linux network to limit it's access to the outside world, both outbound and inbound. We do this primarily through the use & configuration of Netfilter (iptables' rules).
The sections below walk through the basics of a netfilter script to limit the access of a web camera in both the ingress and egress directions, and we discuss various issues and options as they arise.

The configuration of our cameras takes advantage of the fact that our Yocto-based router (embedded Linux development board) is behind another firewall. Therefore, we can keep things relatively simple. If your Linux box is exposed directly to the Internet, then exercise extreme caution and error on the side of blocking too many ports.
For the purpose of limiting the traffic and content that can exit and enter our filtered network, we'll be performing the following tasks:
- Limit the inbound camera connections to only only the services that we require (e.g., HTTP)
- Limit outbound camera connections to only necessary ports / protocols for input into our router (e.g, FTP) and forwarding across our router (i.e., SMTP email)
Note that the terms services, protocols, and ports in this context are synonymous and the association between most well-known services and ports can be referenced on a Linux machine as follows:
$ more /etc/services
# Network services, Internet style
#
# Note that it is presently the policy of IANA to assign a single well-known
# port number for both TCP and UDP; hence, officially ports have two entries
# even if the protocol doesn't support UDP operations.
...

tcpmux		1/tcp				# TCP port service multiplexer
echo		7/tcp
echo		7/udp
discard		9/tcp		sink null
discard		9/udp		sink null
systat		11/tcp		users
daytime		13/tcp
daytime		13/udp
netstat		15/tcp
qotd		17/tcp		quote
msp		18/tcp				# message send protocol
msp		18/udp
chargen		19/tcp		ttytst source
chargen		19/udp		ttytst source
ftp-data	20/tcp
ftp		21/tcp
fsp		21/udp		fspd
ssh		22/tcp				# SSH Remote Login Protocol
...
Background on Netfilter
The Netfilter hooks within the Linux kernel are defined in include/uapi/linux/netfilter.h:
enum nf_inet_hooks {
	NF_INET_PRE_ROUTING,
	NF_INET_LOCAL_IN,
	NF_INET_FORWARD,
	NF_INET_LOCAL_OUT,
	NF_INET_POST_ROUTING,
	NF_INET_NUMHOOKS,
	NF_INET_INGRESS = NF_INET_NUMHOOKS,
};
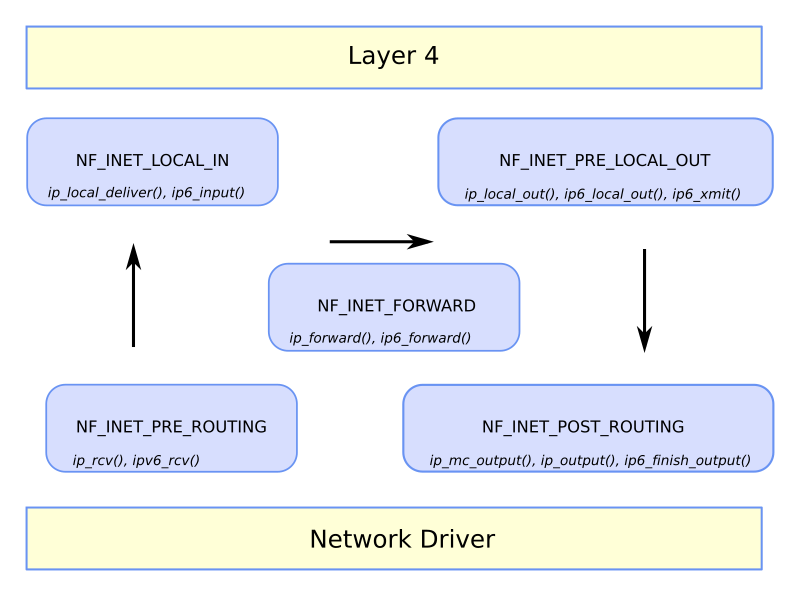
The figure below shows the general flow of IP packet data within the kernel with the primary entry and exit points being the network driver (LAN Access) and layer 4 (CPU access).

Also shown in the above figure are the primary functions that encapsulate the netfilter hooks. For example, use of the NF_INET_PRE_ROUTING hook is shown below within net/ipv4/ip_input.c:ip_rcv(). This function is the primary entry method for receiving IPv4 packets from a network. Note that NF_HOOK is a macro used to invoke registered callback functions that process the received IP packet. Actions that can be taken within a callback include routing the packet to the CPU, forwarding it along, or dropping it.
/*
 * IP receive entry point
 */
int ip_rcv(struct sk_buff *skb, struct net_device *dev, struct packet_type *pt,
       struct net_device *orig_dev)
{
    struct net *net = dev_net(dev);

    skb = ip_rcv_core(skb, net);
    if (skb == NULL)
        return NET_RX_DROP;

    return NF_HOOK(NFPROTO_IPV4, NF_INET_PRE_ROUTING,
               net, NULL, skb, dev, NULL,
               ip_rcv_finish);
}
One last comment on the above figure is that the same enum for Netfilter hooks is used for both IPv4 and IPv6.
Installation
Note that iptables is both a feature of the kernel and a set of user space tools. Many of the tracking features supported by iptables are implemented as kernel modules, which can be found in /lib/modules/<kernel release>/kernel/net. To see how we included netfilter within our Yocto Project, please see Use the Yocto Project with NXP LS1046A Freeway Board.
Anatomy of an iptables rule
Note that some of the discussion below is based in part on a very good book: Linux Firewalls: Attack Detection and Response with iptables, psad, and fwsnort. And for those that want to dive into the inner workings of the Linux kernel networking code, a great reference is Linux Kernel Networking: Implementation and Theory.
An iptables policy is built from an ordered set of rules that describe to the kernel the actions that should be taken against certain classes of packets. Each rule is applied to a chain (e.g., INPUT) within a table (e.g., Filter). A chain is a collection of rules that are compared, in order, against packets that share a common characteristic, such as being input to the Linux system. A table is an iptables' construct that groups categories of functionality.
There are four primary tables:
- filter: filtering rules
- nat: NAT rules
- mangle: specialized rules that alter packet data
- raw: rules that should function independently of the netfilter connection-tracking subsystem
Each table has its own built in set of chains. For our needs, the most important built-in chains are the INPUT, OUTPUT, and FORWARD chains in the filter table.
An example rule:
iptables --append INPUT --match state --state INVALID --jump DROP
- --append INPUT: append this rule onto the end of the INPUT chain
- --match state --state INVALID: utilize the state module to match on an INVALID state
- --jump DROP: the target of this rule is DROP
The end result of this example rule is that all input packets that are part of an invalid state will be dropped.
Creating an iptables script for our Yocto router
The next few sections describe some of the basics of putting together an iptables script. Keep in mind that we're using this Yocto router to protect our cameras. Also, keep in mind that rules are processed in order, and the order can have a significant impact on how a particular packet is processed.
We're first going to clear any existing rules in the Filter and NAT tables.
iptables --flush
iptables --flush --table nat
Delete every non-builtin chain in the filter table. Note that the filter table is the default table.
iptables --delete-chain
Let's take a look at our empty set of iptables' rules:
iptables -L
Chain INPUT (policy ACCEPT)
target     prot opt source               destination

Chain FORWARD (policy ACCEPT)
target     prot opt source               destination

Chain OUTPUT (policy ACCEPT)
target     prot opt source               destination
Set a default drop policy for the input, output, and forward chains respectively. However, be careful with this next step. If you have ssh'd into your Yocto box, your connection will drop.
iptables --policy INPUT DROP
iptables --policy OUTPUT DROP
iptables --policy FORWARD DROP
Next allow loopback access on all ports
iptables --append INPUT -i lo --protocol all --jump ACCEPT
iptables --append OUTPUT -o lo --protocol all --jump ACCEPT
Next we list our iptables' rules in our chains for the filter table (default) with verbose information. While you're displaying this, also generate some traffic into your Yocto router (e.g., try ssh'ing into it). You should discover that you can't connect, and the number of DROP packets keeps increasing.
iptables -L -v
Chain INPUT (policy DROP 72 packets, 10074 bytes)
 pkts bytes target     prot opt in     out     source               destination
    0     0 ACCEPT     all  --  lo     any     anywhere             anywhere

Chain FORWARD (policy DROP 0 packets, 0 bytes)
 pkts bytes target     prot opt in     out     source               destination

Chain OUTPUT (policy DROP 1 packets, 76 bytes)
 pkts bytes target     prot opt in     out     source               destination
    0     0 ACCEPT     all  --  any    lo      anywhere             anywhere
Next, specify that all invalid packets should be dropped and logged. Specify that all packets that are part of an already accepted connection or are related to an accepted connection should also be accepted.
iptables --append INPUT --match state --state INVALID --jump LOG --log-prefix "DROP INVALID " --log-ip-options --log-tcp-options
iptables --append INPUT --match state --state INVALID --jump DROP
iptables --append INPUT --match state --state ESTABLISHED,RELATED --jump ACCEPT
Next, we set up rules to prevent spoofing. For our network, we want to drop any packets that don't have a valid IP address.
CAM_IF = eth1
CAM_NET = 192.168.8.0/24
iptables --append INPUT --in-interface $CAM_IF ! --source $CAM_NET --jump LOG --log-prefix "SPOOFED PKT "
iptables --append INPUT --in-interface $CAM_IF ! --source $CAM_NET --jump DROP
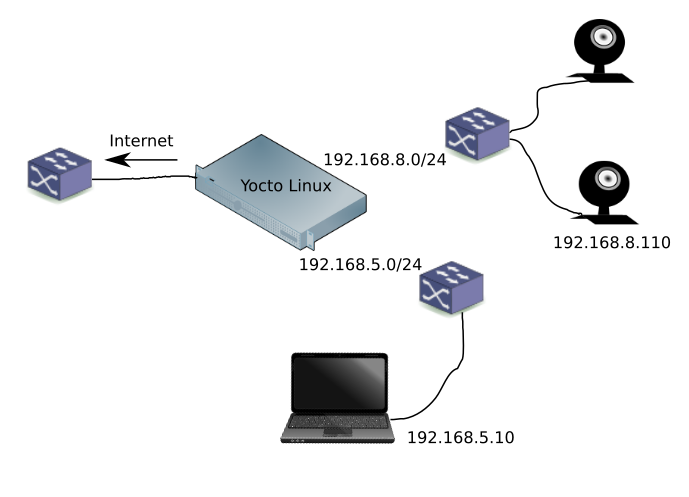
Before we start adding connections to accept, let's finish defining our network. We need to define the device interface (e.g., eth0) and IPv4 subnet for each interface. Referring back to Figure 1, we see we have three networks: external, private, and camera:
EXT_IF=eth0; EXT_NET=192.168.0.0/24;
CAM_IF=eth1; CAM_NET=192.168.8.0/24;
PRIV_IF=eth2; PRIV_NET=192.168.5.0/24;
You may be wondering about IPv6 and how this fits into our network. Well, this is up to you, but we prefer to not deal with it on our internal private networks due to the complexity of dealing with such a large address space, which seems unecessary to protect a few cameras:
ip6tables --policy INPUT DROP
ip6tables --policy OUTPUT DROP
ip6tables --policy FORWARD DROP
We now configure the INPUT chain to accept a ping and an ssh connection. Note, that we only accept ssh connections on PRIV_NET.
iptables --append INPUT --in-interface eth0 -p tcp --source $PRIV_NET --dport 22 --syn -m state --state NEW --jump ACCEPT
iptables --append INPUT --protocol icmp --icmp-type echo-request --jump ACCEPT
Again try to initiate an ssh connection or try pinging your machine. You might be surprised that neither work. This is because you haven't configured rules for the OUTPUT chain. Until you do, packets come in, but they don't go out.
iptables -A OUTPUT -m state --state INVALID -j LOG --log-prefix "DROP INVALID " --log-ip-options
iptables -A OUTPUT -m state --state INVALID -j DROP
iptables -A OUTPUT -m state --state ESTABLISHED,RELATED -j ACCEPT
Note that a global DROP of all OUTPUT packets unless there is an explicit rule can be overly restrictive, especially for a trusted Yocto Linux router, so let's go back and change this:
iptables --policy OUTPUT ACCEPT
Take a look at the rules below for our FORWARD chain.
iptables -A FORWARD -m state --state INVALID -j LOG --log-prefix "DROP INVALID " --log-ip-options --log-tcp-options
iptables  -A FORWARD -m state --state INVALID -j DROP
iptables -A FORWARD -m state --state ESTABLISHED,RELATED -j ACCEPT
iptables -A FORWARD -p tcp -i $PRIV_IF --dport 80 --syn -m state --state NEW -j ACCEP
Regarding the FORWARD chain, in our example we have now blocked services like Skype, Facetime, and also the unknown & unwanted.
For our cameras, we'll want to add input, output, and forwarding rules only as necessary. In the rules above, we have enabled HTTP (port 80) to be forwarded across our router, so the Linux laptop shown in Figure 1 can view the cameras.
Regarding enabling forwarding for SMTP, consider instead writing a simple Python script that performs an email relay function when new files are uploaded to the router via FTP. This would only require INPUT rules into the router from the camera interface.
FTP can be Challenging
Setting up Netfilter rules for FTP might seem trivial, but it typcially isn't. FTP requires two ports: control and data. Setting up a rule for the control port is straightforward, but the rules for the data port depend on whether the data transfer process (DTP) is passive or active. Most cameras that we have worked with use passive mode for data transfer. This mode requires the FTP server to open an unprivledged port (> 1024) for data transfer between the camera and server. This also means that we need to create additioinal rules for our INPUT chain. The challenging thing here is determining the ports that the FTP server will open and may require some investigation to determine how to constrain the FTP server to only allow a managable range of passive data ports.
For example, vsftpd can be constrained as follows:
/etc/vsftpd.conf
pasv_min_port=50000
pasv_max_port=50100
And then we create new INPUT rules for the control port and passive data ports:
iptables --append INPUT --in-interface $CAM_IF -p tcp --source $CAM_NET --dport 21 --syn -m state --state NEW --jump ACCEPT
iptables --append INPUT --in-interface $CAM_IF -p tcp --source $CAM_NET -m multiport --dports  50000:50100 --syn -m state --state NEW --jump ACCEPT
Network Address Translation (NAT)
If we allow our cameras to make requests out to the external network (e.g., Internet), we need our Yocto router to change the camera's source IP address and port to the router's external interface address. In doing so, the router will keep track of each translated address and perform a reverse translation when a response is received.
NAT can apply to both inbound connections to our router from external clients and also for outbound connections initiated from the devices on our internal network. The latter is referred to as source NAT (SNAT).
CAUTION, only do this next step if you actually require your camera to connect to an external interface. Instead, consider implementing all services (e.g., video recording) on your internal network.
$IPTABLES --table nat -A POSTROUTING -s $CAM_NET -o $EXT_IF -j MASQUERADE
Of course, you'll also need to set up forwarding rules similiar to what is shown above for port 80.
Enable Forwarding
By default, a Linux box will not forward packets between network interfaces. This is something we need to explicitly enable, as shown below for ipV4.
# sysctl -w net.ipv4.ip_forward=1
Accessing your cameras via HTTP from another internal network
As shown in Figure 1, we have a Linux laptop on a different internal network (192.168.5.0/24). If we want our laptop to connect to our camera, we may need to add a route on our laptop to direct packets to our Yocto router at 192.168.5.200:
$ sudo ip route add 192.168.8.110 via 192.168.5.200

$ route
Kernel IP routing table
Destination     Gateway         Genmask         Flags Metric Ref    Use Iface
...
192.168.8.110   192.168.3.200   255.255.255.255 UGH   0      0        0 enp2s0
...
A complete, minimal Netfilter script
# Minimal Netfilter Script to be used only for Experimentation
# No warranty or statement of fitness of any kind is conveyed
# User assumes full risk in using this script

#!/bin/sh
EXT_IF=eth0;
EXT_NET=192.168.0.1/24;
CAM_IF=eth1;
CAM_NET=192.168.8.0/24;
PRIV_IF=eth2;
PRIV_NET=192.168.5.0/24;

# Clear out any existing rules
iptables --flush
iptables --flush --table nat
iptables --delete-chain

# Set default policies
iptables --policy INPUT DROP
iptables --policy OUTPUT ACCEPT
iptables --policy FORWARD DROP

ip6tables --policy INPUT DROP
ip6tables --policy OUTPUT ACCEPT
ip6tables --policy FORWARD DROP

# Support loopback / local
iptables --append INPUT -i lo --protocol all --jump ACCEPT
iptables --append OUTPUT -o lo --protocol all --jump ACCEPT

# INPUT rules
iptables --append INPUT --match state --state INVALID --jump LOG --log-prefix "DROP INVALID " --log-ip-options --log-tcp-options
iptables --append INPUT --match state --state INVALID --jump DROP
iptables --append INPUT --match state --state ESTABLISHED,RELATED --jump ACCEPT

iptables --append INPUT --in-interface $CAM_IF ! --source $CAM_NET --jump LOG --log-prefix "SPOOFED PKT "
iptables --append INPUT --in-interface $CAM_IF ! --source $CAM_NET --jump DROP

iptables --append INPUT --protocol icmp --icmp-type echo-request --jump ACCEPT
iptables --append INPUT --in-interface $CAM_IF  -p tcp --source $CAM_NET --dport 21 --syn -m state --state NEW --jump ACCEPT
iptables --append INPUT --in-interface $PRIV_IF  -p tcp --source $PRIV_NET --dport 22 --syn -m state --state NEW --jump ACCEPT
iptables --append INPUT --in-interface $CAM_IF -p tcp --source $CAM_NET -m multiport --dports  50000:50100 --syn -m state --state NEW --jump ACCEPT

# OUTPUT rules
iptables -A OUTPUT -m state --state INVALID -j LOG --log-prefix "DROP INVALID " --log-ip-options
iptables -A OUTPUT -m state --state INVALID -j DROP
iptables -A OUTPUT -m state --state ESTABLISHED,RELATED -j ACCEPT

# FORWARD rules
iptables -A FORWARD -m state --state INVALID -j LOG --log-prefix "DROP INVALID " --log-ip-options --log-tcp-options
iptables  -A FORWARD -m state --state INVALID -j DROP
iptables -A FORWARD -m state --state ESTABLISHED,RELATED -j ACCEPT
iptables -A FORWARD -p tcp -i $PRIV_IF --dport 80 --syn -m state --state NEW -j ACCEPT

# source NAT
#iptables --table nat -A POSTROUTING -s $CAM_NET -o $EXT_IF -j MASQUERADE
Executing our iptables script
Configure iptables by running our script:
$ ./<script name>
If all goes well, you shouldn't see any errors when running the script. However, a lack of errors doesn't necessarily mean your script is functional. You should thorougly test it and will probably need to debug it. Useful tools for debugging netfilter issues include Wireshark and tcpdump.
Next Steps
We plan to improve this article over time by discussing additional strategies and issues in protecting critical devices, such as cameras and equipment for automation. We also envision follow-on articles discussing the development of custom Netfilter modules, the use of nftables, and integration with a Private Island ® network processor.


